
Since OpenStack Queens has been released, we verify from installation to initial use.
Using PackStack, which can easily build OpenStack environment, build a practical OpenStack verification environment with a little customization.
OpenStack version: Queens (Version: 13.0.0)
* Since it is a verification environment, issues remain in security, availability, extensibility, multi tenant etc.
PackStack installation environment problem
I tried Installing OpenStack with PackStack and felt the following issues as a problem.
- Cinder's default capacity is only 20 GB
- The default capacity of Swift is only 2 GB
All of them are storage problems, as soon as the number of instances and objects increases, the capacity becomes insufficient and it becomes useless.
- Testing environment
- CentOS7 setup
- OpenStack installation
- OpenStack installation
- Initial setup of OpenStack
- Start up the CirrOS instance
- Allow SSH login by key pair
- Conclusion - Build practical standalone OpenStack verification environment with PackStack
Testing environment
Physical Server
The server you are using is selected here Dell PowerEdge T110 Ⅱ
en-designetwork.hatenablog.com
CPU: Intel Xeon E3-1220v2 (not support Hyper Threading)
RAM: 24 GB
DISK: 3 TB
Virtual Server
Hyper visor: ESXi 6.5 standalone
Guest OS: CentOS 7 (1708) Minimal
CPU: 4 v CPU (hardware virtualization ON)
RAM: 16 GB
DISK: 32 GB (OS), 128 GB (Cinder), 128 GB (Swift)
DISK mounts multiple for OS, Cinder, Swift respectively.
CentOS7 setup
Detailed omitted. Partitions etc are OK automatically.
Create Storage Space
Set DISK for storage used by OpenStack.
Usage is as follows
/dev/sdb: Cinder
/dev/sdc: Swift
Create a DISK partition.
[root@openstack1 ~]# fdisk /dev/sdb
Command (m for help): n
Partition type:
   p   primary (0 primary, 0 extended, 4 free)
   e   extended
Select (default p): p
Partition number (1-4, default 1): 1
First sector (2048-268435455, default 2048): 2048
Last sector, +sectors or +size{K,M,G} (2048-268435455, default 268435455): 268435455
Partition 1 of type Linux and of size 128 GiB is set

Command (m for help): t
Hex code (type L to list all codes): 8e
Command (m for help): p
   Device Boot      Start         End      Blocks   Id  System
/dev/sdb1            2048   268435455   134216704   8e  Linux LVM

Command (m for help): w
The partition table has been altered!

[root@openstack1 ~]# fdisk /dev/sdc
Command (m for help): n
Partition type:
   p   primary (0 primary, 0 extended, 4 free)
   e   extended
Select (default p): p
Partition number (1-4, default 1):
First sector (2048-268435455, default 2048): 2048
Last sector, +sectors or +size{K,M,G} (2048-268435455, default 268435455): 268435455
Partition 1 of type Linux and of size 128 GiB is set

Command (m for help): t
Hex code (type L to list all codes): 8e
Command (m for help): p
   Device Boot      Start         End      Blocks   Id  System
/dev/sdc1            2048   268435455   134216704   8e  Linux LVM

Command (m for help): w
The partition table has been altered!

[root@openstack1 ~]# lsblk
NAME            MAJ:MIN RM  SIZE RO TYPE MOUNTPOINT
sda               8:0    0   32G  0 disk
├─sda1            8:1    0    1G  0 part /boot
└─sda2            8:2    0   31G  0 part
  ├─centos-root 253:0    0 27.8G  0 lvm  /
  └─centos-swap 253:1    0  3.2G  0 lvm  [SWAP]
sdb               8:16   0  128G  0 disk
└─sdb1            8:17   0  128G  0 part
sdc               8:32   0  128G  0 disk
└─sdc1            8:33   0  128G  0 part
sr0              11:0    1 1024M  0 rom
Create PV, VG, LV, FileSystem.
[root@openstack1 ~]# pvcreate /dev/sdb1
  Physical volume "/dev/sdb1" successfully created.
[root@openstack1 ~]# pvcreate /dev/sdc1
  Physical volume "/dev/sdc1" successfully created.
[root@openstack1 ~]# vgcreate cinder-volumes /dev/sdb1
  Volume group "cinder-volumes" successfully created
[root@openstack1 ~]# vgcreate swift-volumes /dev/sdc1
  Volume group "swift-volumes" successfully created
[root@openstack1 ~]# lvcreate -n swift-lvs -l 100%FREE swift-volumes
  Logical volume "swift-lvs" created.
[root@openstack1 ~]# vgs
  VG             #PV #LV #SN Attr   VSize    VFree
  centos           1   2   0 wz--n-  <31.00g    4.00m
  cinder-volumes   1   0   0 wz--n- <128.00g <128.00g
  swift-volumes    1   1   0 wz--n- <128.00g <128.00g
[root@openstack1 ~]# lvs
  LV            VG             Attr       LSize    Pool
  root          centos         -wi-ao----   27.79g
  swap          centos         -wi-a-----   <3.20g
  swift-lvs     swift-volumes  -wi-ao---- <128.00g

[root@openstack1 ~]# mkfs.ext4 /dev/swift-volumes/swift-lvs
mke2fs 1.42.9 (28-Dec-2013)
Discarding device blocks: done
Filesystem label=
OS type: Linux
Block size=4096 (log=2)
Fragment size=4096 (log=2)
Stride=0 blocks, Stripe width=0 blocks
8388608 inodes, 33553408 blocks
1677670 blocks (5.00%) reserved for the super user
First data block=0
Maximum filesystem blocks=2181038080
1024 block groups
32768 blocks per group, 32768 fragments per group
8192 inodes per group
Superblock backups stored on blocks:
    32768, 98304, 163840, 229376, 294912, 819200, 884736, 1605632, 2654208,
    4096000, 7962624, 11239424, 20480000, 23887872

Allocating group tables: done
Writing inode tables: done
Creating journal (32768 blocks): done
Writing superblocks and filesystem accounting information: done

[root@openstack1 ~]# lsblk
NAME                          MAJ:MIN RM  SIZE RO TYPE MOUNTPOINT
sda                             8:0    0   32G  0 disk
├─sda1                          8:1    0    1G  0 part /boot
└─sda2                          8:2    0   31G  0 part
  ├─centos-root               253:0    0 27.8G  0 lvm  /
  └─centos-swap               253:1    0  3.2G  0 lvm  [SWAP]
sdb                             8:16   0  128G  0 disk
└─sdb1                          8:17   0  128G  0 part
sdc                             8:32   0  128G  0 disk
└─sdc1                          8:33   0  128G  0 part
  └─swift--volumes-swift--lvs 253:2    0  128G  0 lvm
sr0                            11:0    1 1024M  0 rom
[root@openstack1 ~]# df -hT
Filesystem              Type      Size  Used Avail Use% Mounted on
/dev/mapper/centos-root xfs        28G  1.2G   27G   5% /
devtmpfs                devtmpfs  7.8G     0  7.8G   0% /dev
tmpfs                   tmpfs     7.8G     0  7.8G   0% /dev/shm
tmpfs                   tmpfs     7.8G  8.6M  7.8G   1% /run
tmpfs                   tmpfs     7.8G     0  7.8G   0% /sys/fs/cgroup
/dev/sda1               xfs      1014M  171M  844M  17% /boot
tmpfs                   tmpfs     1.6G     0  1.6G   0% /run/user/0
(append) DISK recognition bug
Local Disk Usage seen with Horizon etc. is 27GB of centos-root in this configuration and can not use the full capacity of cinder-volume...
As a provisional countermeasure, if you create a large root and show the capacity big, you can avoid it. (This action is required separately)
NIC information confirmation
Since it is necessary for OpenStack installation, acquire NIC information. In this case, information of ens192 is required.
[root@openstack1 ~]# ip a
1: lo: <LOOPBACK,UP,LOWER_UP> mtu 65536 qdisc noqueue state UNKNOWN qlen 1
    link/loopback 00:00:00:00:00:00 brd 00:00:00:00:00:00
    inet 127.0.0.1/8 scope host lo
       valid_lft forever preferred_lft forever
    inet6 ::1/128 scope host
       valid_lft forever preferred_lft forever
2: ens192: <BROADCAST,MULTICAST,UP,LOWER_UP> mtu 1500 qdisc mq state UP qlen 1000
    link/ether 00:0c:29:39:e7:cf brd ff:ff:ff:ff:ff:ff
    inet 192.168.1.201/24 brd 192.168.1.255 scope global ens192
       valid_lft forever preferred_lft forever
    inet6 fe80::a952:db6b:fd90:a906/64 scope link
       valid_lft forever preferred_lft forever
OpenStack installation
Install OpenStack using PackStack. Basically refer to here for installation method.
https://www.rdoproject.org/install/packstack/
Language setting
LANG=en_US.utf-8
LC_ALL=en_US.utf-8
CentOS Updates packages
# yum update -y
Network Settings
# systemctl disable firewalld
# systemctl stop firewalld
# systemctl disable NetworkManager
# systemctl stop NetworkManager
# systemctl enable network
# systemctl start network
# setenforce 0
# vi /etc/selinux/config
SELINUX=permissive
PackStack installation - answer-file generation
# yum install -y python-setuptools
# yum install -y centos-release-openstack-queens
# yum update -y
# yum install -y openstack-packstack
# packstack --gen-answer-file=answers.cfg
Error occurred without python-setuptools
On March 8, 2018 the following error occurred.
# packstack --gen-answer-file=answers.cfg
ERROR:root:Failed to load plugin from file ssl_001.py
ERROR:root:Traceback (most recent call last):
  File "/usr/lib/python2.7/site-packages/packstack/installer/run_setup.py", line 923, in loadPlugins
    moduleobj = __import__(moduleToLoad)
  File "/usr/lib/python2.7/site-packages/packstack/plugins/ssl_001.py", line 20, in <module>
    from OpenSSL import crypto
  File "/usr/lib/python2.7/site-packages/OpenSSL/__init__.py", line 8, in <module>
    from OpenSSL import rand, crypto, SSL
  File "/usr/lib/python2.7/site-packages/OpenSSL/crypto.py", line 13, in <module>
    from cryptography.hazmat.primitives.asymmetric import dsa, rsa
  File "/usr/lib64/python2.7/site-packages/cryptography/hazmat/primitives/asymmetric/rsa.py", line 14, in <module>
    from cryptography.hazmat.backends.interfaces import RSABackend
  File "/usr/lib64/python2.7/site-packages/cryptography/hazmat/backends/__init__.py", line 7, in <module>
    import pkg_resources
ImportError: No module named pkg_resources

ERROR:root:Traceback (most recent call last):
  File "/usr/lib/python2.7/site-packages/packstack/installer/run_setup.py", line 988, in main
    loadPlugins()
  File "/usr/lib/python2.7/site-packages/packstack/installer/run_setup.py", line 931, in loadPlugins
    raise Exception("Failed to load plugin from file %s" % item)
Exception: Failed to load plugin from file ssl_001.py


ERROR : Failed to load plugin from file ssl_001.py
As you can see.
1526064 – python-cryptography should depend on python-setuptools
# yum install -y python-setuptools
Then fix the issue.
Edit answer-file
Edit the generated answer-file as follows.
# diff ./answers.cfg_default ./answers.cfg

< CONFIG_CINDER_VOLUMES_SIZE=20G
---
> CONFIG_CINDER_VOLUMES_SIZE=120G

< CONFIG_NEUTRON_OVS_BRIDGE_IFACES=
---
> CONFIG_NEUTRON_OVS_BRIDGE_IFACES=br-ex:ens192

< CONFIG_SWIFT_STORAGES=
---
> CONFIG_SWIFT_STORAGES=/dev/swift-volumes/swift-lvs

< CONFIG_SWIFT_STORAGE_SIZE=2G
---
> CONFIG_SWIFT_STORAGE_SIZE=120G

< CONFIG_PROVISION_DEMO=y
---
> CONFIG_PROVISION_DEMO=n
CONFIG_NEUTRON_OVS_BRIDGE_IFACES=br-ex:<checked interface by ip a>
CONFIG_SWIFT_STORAGES=<Created LV>
As for cinder, if you set the VG name as cinder-volumes, it is unnecessary to set the individual here.
Although it is a little old information, the following RedHat information is helpful for editing content.
RedHat - APPENDIX A. ANSWER FILE CONFIGURATION KEYS
OpenStack installation
Install OpenStack with answer file. Various installations run with puppet. It took about 30 minutes in my environment.
# packstack --answer-file=./answers.cfg
It is recommended to run from the console as session disconnection may occur. Restart after completing.
# reboot
Initial setup of OpenStack
Accessing http://<IP or FQDN> OpenStack dashboard will be displayed.
The credential (authentication information) is generated in the server root.
# cat ~/keystonerc_admin
unset OS_SERVICE_TOKEN
    export OS_USERNAME=admin
    export OS_PASSWORD='PASSWORD'
    export OS_AUTH_URL=http://192.168.1.201:5000/v3
    export PS1='[\u@\h \W(keystone_admin)]\$ '

export OS_PROJECT_NAME=admin
export OS_USER_DOMAIN_NAME=Default
export OS_PROJECT_DOMAIN_NAME=Default
export OS_IDENTITY_API_VERSION=3
Generate key pair
Access to the VM deployed on OpenStack requires SSH secret key. Generate a key pair and save it locally.

Creating network
In this case, bridge the host CentOS and connect directly to the external network. The setting is as follows. (Setting Prompt omitted)
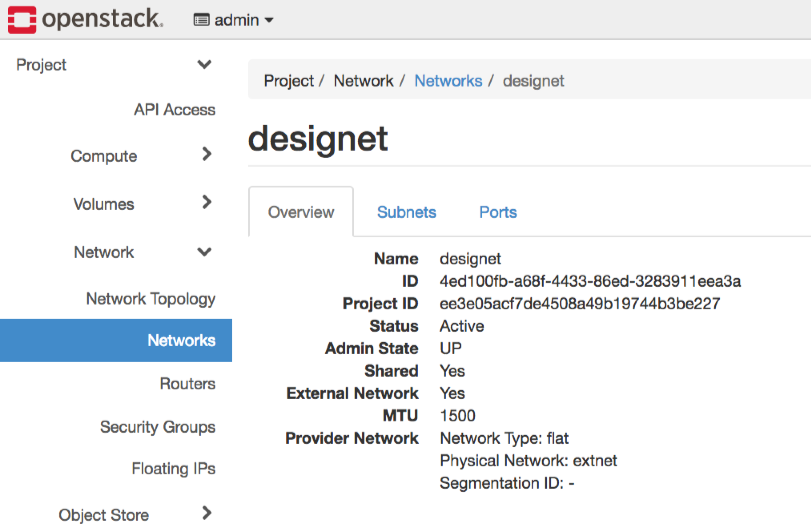
First, create a network.
External network: true,network type: flat, physical network: extnet.
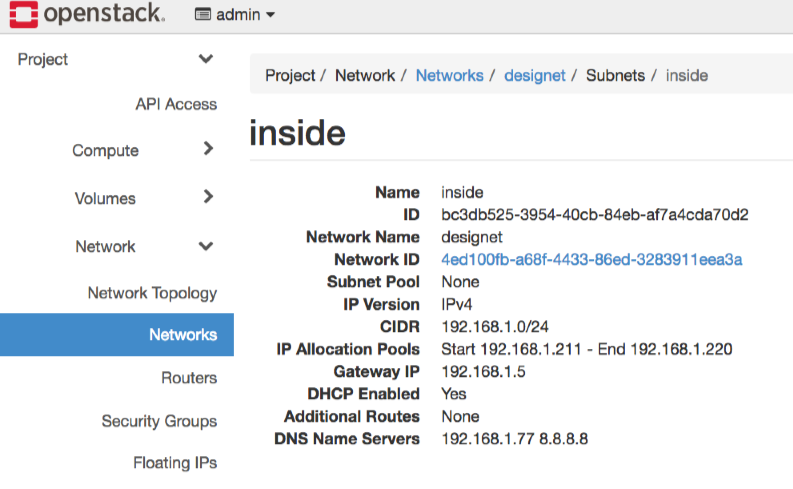
Create a subnet in it. Also enable DHCP.
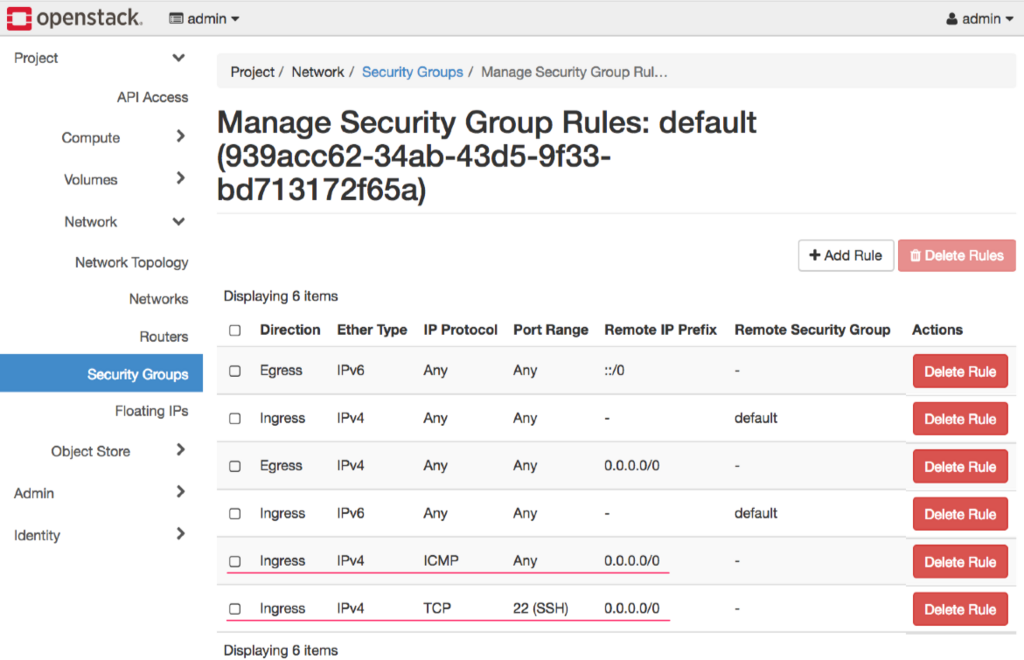
Add ICMP & SSH to security group
Add ALL ICMP and SSH to security group default at 0.0.0.0/0 .
Download and register images
Download OS image. I will use CirrOS for the OpenStack minimal test.
イメージの入手 — Virtual Machine Image Guide ドキュメント
You can download it directly from here. (v0.4.0)
http://download.cirros-cloud.net/0.4.0/cirros-0.4.0-x86_64-disk.img
Register the downloaded image from Project > Compute > Images.
Start up the CirrOS instance
Launch an instance of the registered CirrOS image.
Images > cirros > Launch
It is possible to start with the flavor of m1.tiny. The network, the security group, and the key pair are specified in the above.
Check the log of the created instance. It is OK if it is output like the following.
=== system information ===
Platform: RDO OpenStack Compute
Container: none
Arch: x86_64
CPU(s): 1 @ 3092.836 MHz
Cores/Sockets/Threads: 1/1/1
Virt-type: AMD-V
RAM Size: 488MB
Disks:
NAME  MAJ:MIN       SIZE LABEL         MOUNTPOINT
vda   253:0   1073741824
vda1  253:1   1064287744 cirros-rootfs /
vda15 253:15     8388608
=== sshd host keys ===
-----BEGIN SSH HOST KEY KEYS-----
ssh-rsa AAAAB3...Tb root@cirros
ssh-dss AAAAB3...== root@cirros
-----END SSH HOST KEY KEYS-----
=== network info ===
if-info: lo,up,127.0.0.1,8,,
if-info: eth0,up,192.168.1.217,24,fe80::f816:3eff:fe5d:26c4/64,
ip-route:default via 192.168.1.5 dev eth0
ip-route:192.168.1.0/24 dev eth0  src 192.168.1.217
ip-route6:fe80::/64 dev eth0  metric 256
ip-route6:unreachable default dev lo  metric -1  error -101
ip-route6:ff00::/8 dev eth0  metric 256
ip-route6:unreachable default dev lo  metric -1  error -101
=== datasource: None None ===
=== cirros: current=0.4.0 uptime=260.09 ===
  ____               ____  ____
 / __/ __ ____ ____ / __ \/ __/
/ /__ / // __// __// /_/ /\ \
\___//_//_/  /_/   \____/___/
   http://cirros-cloud.net


login as 'cirros' user. default password: 'gocubsgo'. use 'sudo' for root.
cirros login:
SSH access to CirrOS
SSH access to the IP address displayed in the instance information (in the above log). Password is diplayed in the log.
$ ssh cirros@192.168.1.217

cirros@192.168.1.217's password: gocubsgo
$ pwd
/home/cirros
$ uname -a
Linux cirros 4.4.0-28-generic #47-Ubuntu SMP Fri Jun 24 10:09:13 UTC 2016 x86_64 GNU/Linux
You can SSH access to CirrOS and login.
Allow SSH login by key pair
You can not log in with the SSH key pair you registered as above. (I could not do it in my environment)
Login with SSH public key is enabled with additional setting.
Create internal network & router
Make the state of cirros-03 in the figure below. (SSH key pair is not registered in cirros-01, 02)
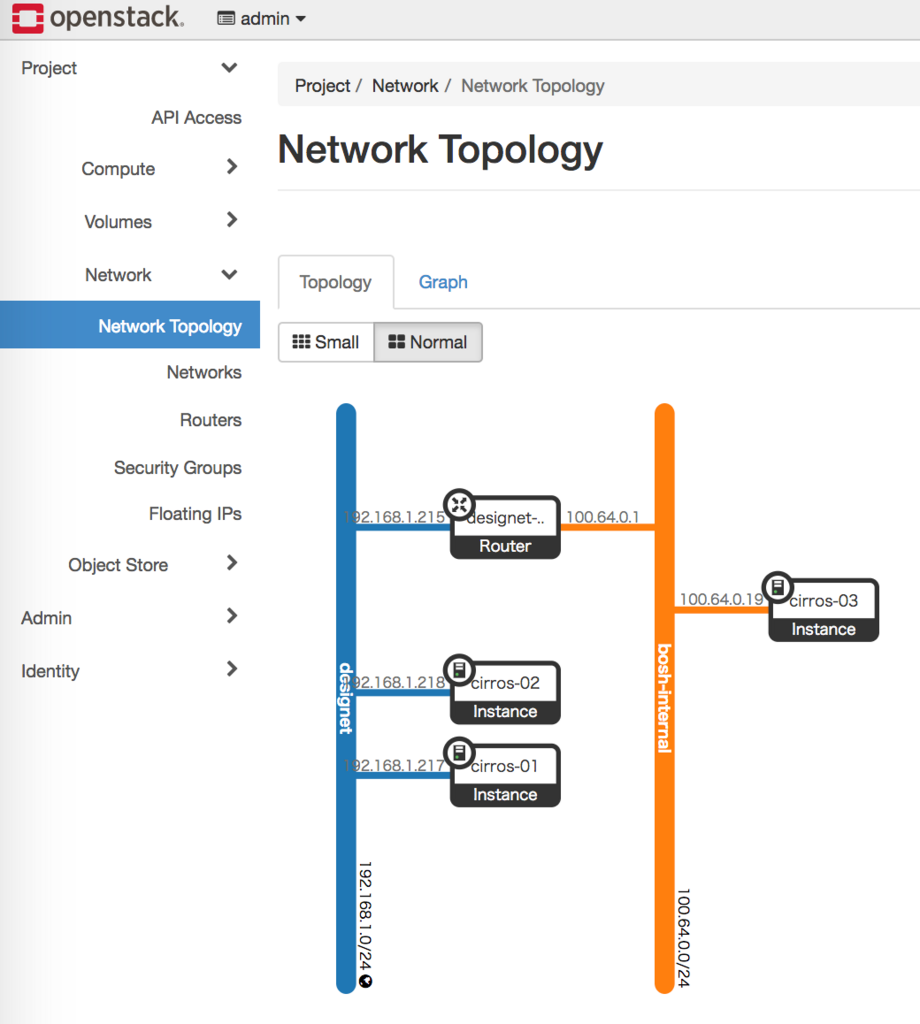
The setting outline is as follows.
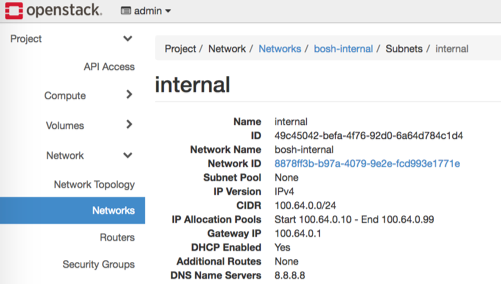
Create an internal network. I decided it to bosh-internal because I wanted to build a BOSH verification environment, but anything is fine.
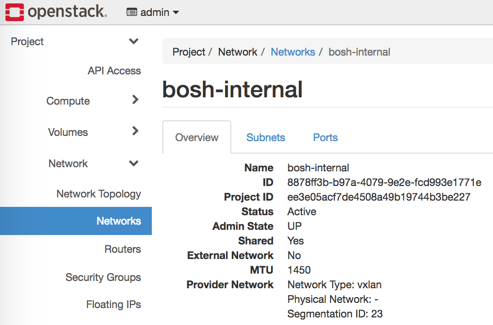
Also create a subnet. Allocate a shared address (100.64.x.x) for internal use.
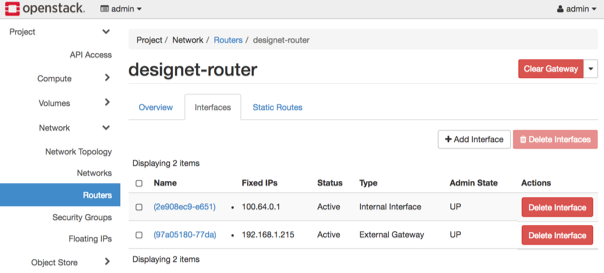
Create routers and connect to each network.
Create Floating IP.
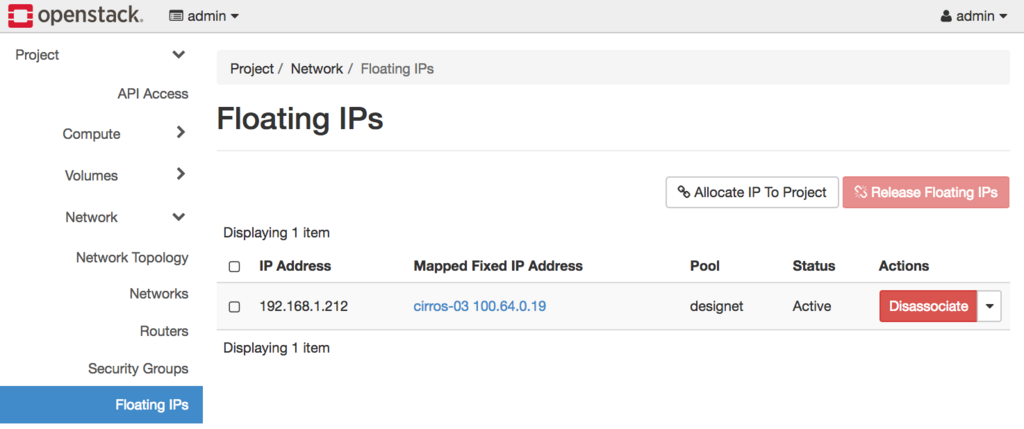
In this environment, you specify the internal network, start the instance, assign the IP address with Associate Floating IP.
SSH connection with using SSH secret key
It successfully registered with the instance with the key pair, and it becomes possible to use SSH login without password with the secret key.
# ssh -i <key> cirros@192.168.1.212
The authenticity of host '192.168.1.212 (192.168.1.212)' can't be established.
ECDSA key fingerprint is SHA256:xxx.
ECDSA key fingerprint is MD5:xxx.
Are you sure you want to continue connecting (yes/no)? yes
Warning: Permanently added '192.168.1.212' (ECDSA) to the list of known hosts.
$ uname -a
Linux cirros-03 4.4.0-28-generic #47-Ubuntu SMP Fri Jun 24 10:09:13 UTC 2016 x86_64 GNU/Linux
$ ip a
1: lo: <LOOPBACK,UP,LOWER_UP> mtu 65536 qdisc noqueue qlen 1
    link/loopback 00:00:00:00:00:00 brd 00:00:00:00:00:00
    inet 127.0.0.1/8 scope host lo
       valid_lft forever preferred_lft forever
    inet6 ::1/128 scope host
       valid_lft forever preferred_lft forever
2: eth0: <BROADCAST,MULTICAST,UP,LOWER_UP> mtu 1450 qdisc pfifo_fast qlen 1000
    link/ether fa:16:3e:cb:11:e0 brd ff:ff:ff:ff:ff:ff
    inet 100.64.0.19/24 brd 100.64.0.255 scope global eth0
       valid_lft forever preferred_lft forever
    inet6 fe80::f816:3eff:fecb:11e0/64 scope link
       valid_lft forever preferred_lft forever
Conclusion - Build practical standalone OpenStack verification environment with PackStack
I built a practical OpenStack standalone verification environment with PackStack that can easily construct OpenStack environment.
- Cinder's default capacity is only 20 GB
- The default capacity of Swift is only 2 GB
We solved the problem related to storage such as that we were able to construct an environment that can be used for verification.