Cloud Foundry has a wide market share as PaaS infrastructure software. Pivotal Cloud Foudry, one of its commercial distributions, is also widely used in commercial services.
Cloud Foundry is composed of many components and requires a large base as IaaS. This time, we will build Cloud Foundry easily at home with PCF Dev (Pivotal Cloud Foundry Develop) which can be composed of one all in one.
- PCF Dev System Requirements
- Home server configuration
- Install PCF Dev
- Install Ubuntu, VirtualBox
- Install PCF Dev
- trouble shooting
- Conclusion
PCF Dev System Requirements
PCF Dev system requirements are here
PCF requirement is VirtualBox 5.0 or higher. The base machine can be Windows, Mac OS X, Linux.
PCF Dev uses VirtualBox version 5.0 and above as its virtualizer.
The outline of the system requirements is as follows. HDD capacity and memory capacity of PCF Dev, Pivotal Cloud Foundry, Cloud Foundry are listed. (Quoted from Pivotal Docs)
Noteworthy points (merit) is the required number of memory. The CPU only has to put up with comfort, you can increase the HDD. However, it does not start without memory. And the upper limit of memory that can be increased depends on the server (board), and the machine with the large capacity memory has its own price. If it is 3 GB of memory, it can be installed well on desktop PCs and notebook PCs.
| index | PCF Dev | PCF | CF |
|---|---|---|---|
| Space required | 20 GB | 100GB+ | 50GB+ |
| Memory required | 3 GB | 50GB+ | variable |
(reference) PCF Dev Overview | VMware Tanzu Docs
Home server configuration
I use ESXi on old server I got from my friend. Because of the motherboard's relationship CPU is Core 2 Quad.
Physical server
- DELL PowerEdge SC 440
- CPU: Core 2 quad Q6700 2.66 GHz
- Memory: 8 GB
- VMware ESXi (vSphere) 5.5.0 Build 1623387
Virtual server Ubuntu 16.04.1 (Linux)
- CPU: 1 CPU 2 core - Memory: 3 GB
- DISK: 64 GB
- Virtual Box 5.1
Install PCF Dev
The table of contents for installing PCF Dev on Linux is as follows.
- Prerequisites
1. VirtualBox
2. Cloud Foundry Command Line Interface - Install PCF Dev
- Stop PCF Dev
- Uninstall PCF Dev
(reference) Installing PCF Dev on Linux | VMware Tanzu Docs
Install Ubuntu, VirtualBox
As Linux, use Ubuntu which is also used in PCF. Any Linux can be used as long as it runs VirtualBox.
You can download Ubuntu from here.
This time use Ubuntu Server 16.04.1 LTS of Long Term Support.
VirtualBox is here.
Linux_Downloads – Oracle VM VirtualBox
Create a Linux VM on vSphere mentioned above, mount Ubuntu iso and install it. * For Proxy environment such as internal company NW, Proxy server specification is required
(Here, detailed procedure omitted)
At the time of installation I checked the VM somehow and the virbr 0 interface appeared and I was puzzled. Leave the default (standard system utilities only) here.

Setting Ubuntu's IP address
Set the IP address as the initial setup (work from the console). Comment out the DHCP setting as follows and set a fixed IP address.
$ sudo -s
[user password]    // describe with root account from here
# vi /etc/network/interfaces

"/etc/network/interfaces" 21L, 493C
# This file describes the network interfaces available on your system
# and how to activate them. For more information, see interfaces(5).

source /etc/network/interfaces.d/*

# The loopback network interface
auto lo
iface lo inet loopback

# The primary network interface
auto ens160
#iface ens160 inet dhcp  //Comment Out DHCP
iface ens160 inet static   // Add Static Config as below;
address 192.168.1.55
network 192.168.1.0
netmask 255.255.255.0
broadcast 192.168.1.255
gateway 192.168.1.5
dns-nameserver 192.168.1.77
dns-nameserver 8.8.8.8
SSH connection permission setting
Install the SSH server with the following command. This allows SSH connection with TeraTerm and others.
# apt-get install openssh-server
Install VirtualBox on Ubuntu 16.04.1.
Basically it can be installed by the official procedure.
Add a repository.
Add the following line to / etc / apt / sources.list.
# vi /etc/apt/sources.list
<Last Row>
## Add for VirtualBox
deb http://download.virtualbox.org/virtualbox/debian xenial contrib
Exclude because it failed from here
Get the Oracle public key. Execute the following command according to the OS.
for Debian 8 ("Jessie") / Ubuntu 16.04 ("Xenial") and later
# apt-key add oracle_vbox_2016.asc
for older distributions.
# apt-key add oracle_vbox.asc
root@ubuntu-pcf:~# apt-key add oracle_vbox_2016.ascgpg: can't open `oracle_vbox_2016.asc': No such file or directory
root@ubuntu-pcf:~# apt-key add oracle_vbox_2016.asc
gpg: can't open `oracle_vbox_2016.asc': No such file or directory
Explicitly obtain from the Internet with the following command and add the public key. Adjust _2016 according to OS as above.
root@ubuntu-pcf:~# wget -q https://www.virtualbox.org/download/oracle_vbox_2016.asc -O- | sudo apt-key add -
OK
Update the package and install VirtualBox.
root@ubuntu-pcf:~# apt-get update
0% [Working]            Get:1 http://download.virtualbox.org/virtualbox/debian xenial InRelease [7,894 B]
<snip>
The following packages will be upgraded:
  libc6
1 upgraded, 240 newly installed, 0 to remove and 61 not upgraded.
Need to get 149 MB of archives.
After this operation, 591 MB of additional disk space will be used.
Do you want to continue? [Y/n] Y
<about 5 minutes takes from here>
Processing triggers for dbus (1.10.6-1ubuntu3.1) ...
root@ubuntu-pcf:~#
root@ubuntu-pcf:~# apt-get install virtualbox
Reading package lists... Done
Building dependency tree
Reading state information... Done
The following packages were automatically installed and are no longer required:
  diffstat gdbserver libaacs0 libapt-pkg-perl libasprintf-dev libbabeltrace-ctf1 libbabeltrace1 libbdplus0 libc6-dbg libexpat1:i386
  libffi6:i386 libglib2.0-0:i386 libnm-util2 libpam-systemd:i386 libpolkit-agent-1-0:i386 libpolkit-backend-1-0:i386
  libpolkit-gobject-1-0:i386 librarian0 libspeexdsp1 libsynctex1 libwebrtc-audio-processing-0 os-prober policykit-1:i386 rtkit t1utils xvt
Use 'sudo apt autoremove' to remove them.

<snip>
DKMS: install completed.
Setting up virtualbox (5.0.24-dfsg-0ubuntu1.16.04.1) ...
Installation complete.
Install PCF Dev
Follow the procedure below to install PCF Dev.
- Install cfCLI
- Download PCF Dev
- Install PCF Dev Plugin
Install cfCLI
Download cfCLI (Cloud Foundry Command Line Interface) from Github and install it. PCF setting and application deployment are executed through cfCLI.
The installation procedure is as described in Github.
# ...first add the Cloud Foundry Foundation public key and package repository to your system
$ wget -q -O - https://packages.cloudfoundry.org/debian/cli.cloudfoundry.org.key | sudo apt-key add -
$ echo "deb http://packages.cloudfoundry.org/debian stable main" | sudo tee /etc/apt/sources.list.d/cloudfoundry-cli.list
# ...then, update your local package index, then finally install the cf CLI
$ sudo apt-get update
$ sudo apt-get install cf-cli
Installation of cfCLI is completed when version is displayed with cf -v.
root@ubuntu-pcf:~# cf -v
cf version 6.22.2+a95e24c-2016-10-27
Download PCF Dev
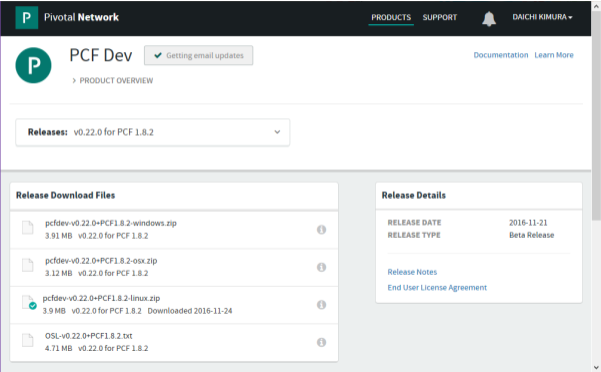
First, download PCF Dev from Pivotal Networks.
Pivotal products basically require licenses (paid). However, it can be used for OSS licenses (free of charge) for open source and EULA (for free) for beta version. License details are here.
PCF Dev download here. User registration with Pivotal Network is required. (Free · No license required)
Download PCF Dev — VMware Tanzu Network
This time download the Linux version.
The zip file of the downloaded PCF Dev is transmitted to the server by TeraTerm's SSH SCP or the like.
If unzip is not installed on the server, install it with apt install unzip.
Extract as follows. The version was fixed according to the downloaded one.
root@ubuntu-pcf:~# unzip pcfdev-v0.22.0+PCF1.8.2-linux.zip
Archive:  pcfdev-v0.22.0+PCF1.8.2-linux.zip
  inflating: pcfdev-v0.22.0+PCF1.8.2-linux
root@ubuntu-pcf:~# ls -l
total 16264
-rwxr-xr-x 1 root   root   12566384 Nov 18 22:57 pcfdev-v0.22.0+PCF1.8.2-linux
-rw-r--r-- 1 ubuntu ubuntu  4085585 Nov 24 23:50 pcfdev-v0.22.0+PCF1.8.2-linux.zip
root@ubuntu-pcf:~#
Install the PCF Dev plugin.
Install the PCF Dev plugin with the following command.
root@ubuntu-pcf:~# ./pcfdev-v0.22.0+PCF1.8.2-linux
Plugin successfully installed. Current version: 0.22.0. For more info run: cf dev help
When installation is completed, start PCF Dev. At this time, a warning is displayed if the free memory is less than 3072 MB. Because the PCF Dev system requirement was 3 GB, I created Ubuntu with 3 GB, but I did not consider the OS part ... The Linux server itself is considered to be suitable for making memory 4 GB.
root@ubuntu-pcf:~# cf dev start

Less than 3072 MB of free memory detected, continue (y/N): > y
Please sign in with your Pivotal Network account.
Need an account? Join Pivotal Network: https://network.pivotal.io

Email> <Enter Your Pivotal Networks Account>

Password> <Enter Your Pivotal Networks Password>

BETA SOFTWARE END USER LICENSE AGREEMENT
<Documents>
[y] Accept
[n] Do Not Accept
y

Downloading VM...
<It takes about 20 minutes>
Progress: |====================>| 100%
VM downloaded.
Allocating 3072 MB out of 3008 MB total system memory (2815 MB free).
Importing VM...
Starting VM...
FAILED
Error: failed to start VM: failed to execute 'VBoxManage startvm pcfdev-v0.389.0 --type headless': exit status 1: VBoxManage: error: VT-x is not available (VERR_VMX_NO_VMX)
VBoxManage: error: Details: code NS_ERROR_FAILURE (0x80004005), component ConsoleWrap, interface IConsole
Waiting for VM "pcfdev-v0.389.0" to power on...
.
Failed to start with VirtualBox error ... Investigate from error log.
trouble shooting
Troubleshoot while checking the status.
FAILED
Error: failed to start VM: failed to execute 'VBoxManage startvm pcfdev-v0.389.0 --type headless': exit status 1: VBoxManage: error: VT-x is not available (VERR_VMX_NO_VMX)
VBoxManage: error: Details: code NS_ERROR_FAILURE (0x80004005), component ConsoleWrap, interface IConsole
Waiting for VM "pcfdev-v0.389.0" to power on...
VBoxManage: error: VT-x is not available (VERR_VMX_NO_VMX)
It seems that VT-x (CPU virtualization mechanism) is not working. But as I said, my Ubuntu is a virtual machine on vSphere. It is virtualized.
I checked the operation as follows, referring to this. (Sorry in Japanese)
root@ubuntu-pcf:~# VBoxManage list vms
"pcfdev-v0.389.0" {9ba0d031-fd10-4260-8f83-698432259210}
root@ubuntu-pcf:~# VBoxManage modifyvm 9ba0d031-fd10-4260-8f83-698432259210 --ioapic off
root@ubuntu-pcf:~# VBoxManage startvm 9ba0d031-fd10-4260-8f83-698432259210 --type separate
Waiting for VM "9ba0d031-fd10-4260-8f83-698432259210" to power on...
VM "9ba0d031-fd10-4260-8f83-698432259210" has been successfully started.
However, it failed as well as trying to start up with the cf dev start command in the end.
Setting for nesting ESXi
When I thought calmly, I did not know whether VT - x is running in Ubuntu (Linux) of the guest OS. This time it is a nested configuration, so we needed additional settings. Activate VT - x of the guest OS and restart the service.
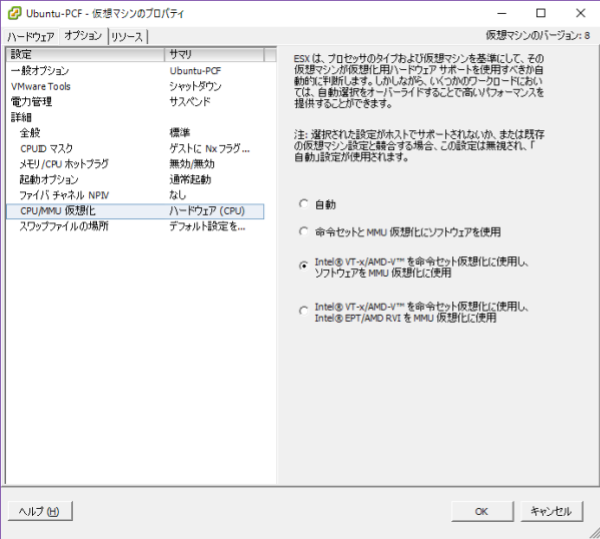
# vi /etc/vmware/config

libdir = "/usr/lib/vmware"
authd.proxy.nfc = "vmware-hostd:ha-nfc"
authd.proxy.nfcssl = "vmware-hostd:ha-nfcssl"
authd.proxy.vpxa-nfcssl = "vmware-vpxa:vpxa-nfcssl"
authd.proxy.vpxa-nfc = "vmware-vpxa:vpxa-nfc"
authd.fullpath = "/sbin/authd"
vhv.enable = TRUE    // add

# /etc/init.d/hostd restart
watchdog-hostd: Terminating watchdog process with PID 98940
hostd stopped.
Ramdisk 'hostd' with estimated size of 127MB already exists
hostd started.
~ #
By default, vSphere's guest OS does not have VT-x enabled. Poweroff the virtual machine and change the setting. "CPU / MMU virtualization" in the "Options" tab defaults to "automatic", "Use Intel VT - x / AMD - v for instruction set virtualization, use software for MMU virtualization" . Work in the order of virtual machine poweroff> change setting> virtual machine power on.
However, an error occurred when trying to power on. Failure ...
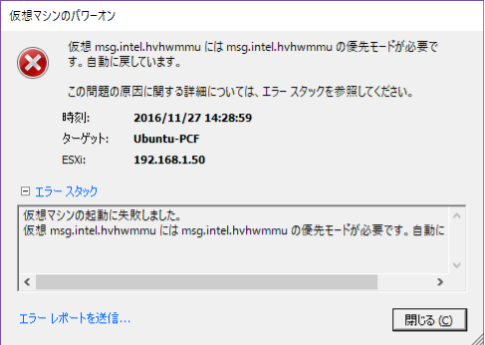
Virtual msg.intel.hvhwmmu requires the priority mode of msg.intel.hvhwmmu. It is returning to automatic.
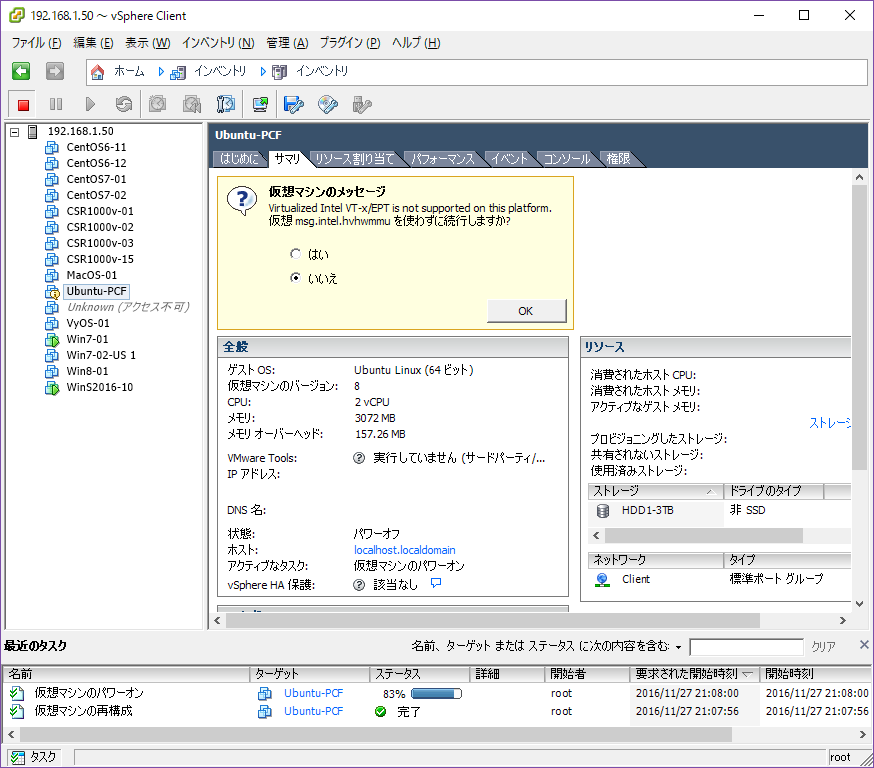
I can not start the virtual machine. Such errors are displayed on the summary screen.
Virtualized Intel VT-x / EPT is not supported on this platform. Continue without using virtual msg.intel.hvhwmmu?
CPU (Core 2 Quad) does not support guest virtualization
I found the following discussion when I was investigating without knowing the cause.
According to here, Core 2 Quad does not support Nested VM ...
Conclusion
I installed PCF Dev on my home Linux. However, Core 2 Quad in my environment does not support Nested VM, PCF Dev on VirtualBox did not start ...
(Please point out if there is a misrecognition etc.)